Pages

Saturday 14 December 2019

50 SKETCHBOOKS!


I can't quite believe it myself but I've just started my 50th sketchbook in 19 years.
I've decided to dedicate it to the trees in my garden which have grown up with us during our life here in France for the last 16 years.  I'm using an old spiral bound book which has had half of the pages taken out so that there is enough space to allow for extra pieces of paper and fabric to be added in.


I began with my favourite trees, the three silver birches in the front garden which we planted not long after we arrived in 2003.  I've drawn them many times over the last few years and now they are the tallest trees we have, enjoyed by all the birds that sit there to sing or watch the sun rise.


After an autumn shower the delicate hanging branches hold the raindrops that glitter in the sun low in the sky at this time of year.  I've captured this lovely sight on crumpled pastel paper in soft drawing pencils.


Then I made a stitched version of the view using a scrap of textured black fabric, layered with organza and stitched in assorted threads and yarns.  I love making French knots for the sparkles!


A detailed drawing of the delicate twigs with a background of distant autumnal trees.


I took a few photos one day and made this drawing, again on crumpled paper using graphitint watersoluble pencils.  It's surprising how many colours you can see if you look more closely at something.


This drawing is of a piece of bark that fell off the tree last year and kept in my nature collection drawer ready to be drawn when the mood took me.


I made this stitched version of the bark on a printed cotton scrap, layered with odd bits of silk and organza for the texture.  I enjoyed interpreting the markings in different coloured threads and couched on woollen yarns.


A few metres away from the silver birches stands the pine tree, which came home as a small lollipop shaped sapling in the back of the car.  Now it looks ancient with a thick trunk covered in deeply textured bark and wounds where we've had to cut off low branches.  I made this drawing last year, sitting on the bank next to the tree and using a fine black pen.


I traced the drawing onto white cotton organdie and stitched the lines in fine black thread.  There's a gap down the middle because I had to split the picture to spread it over a pair of pages.


I made rubbings and took lots of close up photos of the pine bark and here is my interpretation of a small section.  I find the shapes quite fascinating, those bits that look like nipples are where tiny twigs grew out of the trunk.


So of course I had to find a way to interpret this in fabric and thread and found some thickish black backed jersey fabric in grey and brown which I cut into shapes and appliqued together with various threads and couched yarns.


This is the embroidered cover I've made to go over the original book, bark printed fabric coloured with inktense pencils.  The writing goes vertically along the spine but I can't seem tomake this photo turn.
I have a couple more trees to draw and stitch so I'll be seeing you again soon.
Have a happy Christmas and an excellent creative New Year!


Saturday 9 November 2019

ESTHER'S PORTRAIT


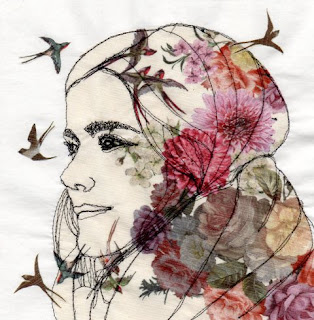
Today is my niece Esther's birthday and I'm celebrating with this portrait inspired by a photo I took of her posing by her graffiti earlier this year.


Esther is a talented artist mainly working in acrylics and one day last winter she went out with some spray paints and produced this self portrait on a rail footbridge near her home.


I started by printing out the photo and tracing her outline, then found this beautiful chiffon fabric in my stash.


I attached bondaweb to the back, cut out the image using the traced outline then ironed it onto a piece of white cotton fabric.  Next I used my lightbox to transfer the picture to the chiffon in a pen that disappears when heat is applied.  As you can see I carefully positioned the portrait using the printed image to make the most of the flowers and birds. 


I stretched the fabric in my large embroidery ring and started to free machine stitch on the lines I had drawn using a fine nylon thread, the sort normally used for invisible hems in manufactured clothes.  I chose this thread as it has a softer look than normal black cotton.  After I had finished the stitching I decided to cut out a few of the swallows from the spare fabric to iron on around the portrait as they all had bondaweb on the back, making it very easy.


Here's the back of the portrait which I think is just as pretty.


I decided to have a go at making a portrait of Esther's brother Sebastian in the same style.  I love how the birds appeared on his face especially as he is keen on travel and has flown the nest several times already in his life.


The machine embroidery in progress on my beloved Bernina.


Like Esther's portrait I added some extra birds flying out, can you just imagine what's going on in his mind, where to next?  The photo this was inspired by was taken when he was travelling in Cambodia.


Tuesday 1 October 2019

AUTUMN 2109 CAMPING TRIP

 
We had a good time in September camping close to home and our first stop was at St Cast le Guildo, not far from Dinard on the north coast of Brittany and only one and a half hours drive away.  The campsite was on terraces with lovely views across the bay towards the next headland. This is the view through our door on our plot where we spent a week, walking and getting together with our caravanning friends at the start of their own autumn holiday.

I usually gather a bunch of typical wild flowers to put on our table and here is the first selection.

There was a lovely coastal path around the beach at St Cast, lined with rocks and boulders, many of them covered with brightly coloured lichen.

The rock Samphire growing in the cracks was a lovely bright lime green that contrasted with the orange lichen and the dark grey of the granite rocks.

I decided to interpret them in a hand embroidered stitchpic, coloured with inktense crayons then stitched in various yarns.

This is a sprig of Eucalyptus I picked from a beautiful tree we came across in a park in the town.  The seed heads are an interesting shape, like little bells.

 
Our next stop was at Angers, a town we've often driven through but this was the first time we stopped to explore.  We found a handy campsite, only 3 kilometres from town with access to the wonderful cycle and footpaths that  lead along the rivers and through the countryside as well as into the town. We spent a couple of happy days exploring the banks of the river Maine where it joins the Loire .

 
The mistletoe covered trees have always fascinated me and after drawing them I just had to make this embroidery using various scraps collaged onto green linen.  There's nothing nicer than sitting in the sun after a tiring cycle ride stitching a new picture!
 
We had a brief stopover at Saumur and took a walk into town in the hot sunshine when we had to stop for a rest in the shade to admire the chateau.

Our final campsite was the municipal at Chinon where we've stayed many times before.  We were lucky enough to find our favourite pitch available with this lovely view of the castle clock tower above the trees.
 
I'll finish with this sunset view of the castle reflected in the river Vienne taken from the campsite, now you can understand why this is our favourite place!
 

Tuesday 13 August 2019

MY FIRST SELFIE

 
When I was studying dress design at art college in 1966 my boyfriend was a student of photography and one evening he took me to his part of the college to take some photos.


I put on one of my latest creations, a jumpsuit made from burgundy coloured needlecord and tied my hair back with a wide velvet ribbon.

 
In the photography department there was a huge roll of white paper that spread out over the floor and I was told to stand there and pose moodily.

 
Being only 16 at the time and not used to being photographed I didn't really know how to pose, despite studying Vogue magazine closely every month.

 
However the photos weren't too bad when John developed and printed them.

 
I lost the photos for many years and have only just rediscovered them so I felt I had to make something special of them.

 
I traced the faces to start with as well as the figures on a smaller scale then transferred the faces to a piece of white linen using my light box and an erasable pen.

 
I cut out the hair and collar shapes from a piece of Liberty fabric that I had backed with bondaweb and pressed them in place before machine stitching all the lines in black thread and straight stitches.


I used some organza for the shading around the eyes and hand stitched the figure outlines afterwards.
 
 
I think the back of the picture is just as interesting as the front as I tried to keep my threads under control!


I'm really pleased with the result and I think I'll try this treatment on some other photos soon.....

Saturday 3 August 2019

UP-CYCLING BOB'S SHIRTS

 
My weaving addiction is keeping me busy and recently I decided I needed to make something to display my holiday stitchpics on.  I wanted to use the soft blues of Bob's old shirts and some green linen from my stash along with some cotton yarns.

 
I cut up the shirts and kept the collars and button bands to use later and started to make strips from the fabrics.

 
I used a rotary cutter on a cutting mat to make even sized strips approximately 2 cms wide.  I found a pale blue net curtain donated by a friend and some green organza to add variety to the collection.

 
I set up the loom with pale blue cotton yarn and started to weave a 35 cm square, luckily it just fitted on the loom although it was a bit tight as I got near the end.

 
Here's a close up of one of the 9 squares I made over a week of afternoons;

 
And here is a square auditioning for it's future role as a background for my favourite holiday stitchpic.

 
I think this is going to turn out well as the colours complement each picture perfectly.

 
I machine stitched around all the edges of the squares to keep the weaving secure, cut away the surplus ends and then machined them together into a metre square.  I used a slice from an old sheet to back the piece and then I used the collars and button straps to edge it.  The collar stands became the loops at the top to hang it to the rail.

 
Here it is completed at last ready for the next step.

 
I have hand stitched each picture to the hanging and left plenty of space for future embroideries to be added.  It will soon be hanging in the hall, as soon as I can persuade Bob to drill some holes in the wall for the rail!