Pages

Wednesday 31 December 2014

HAPPY NEW YEAR 2015

 
For my last post of 2014 I wish all my followers and readers a very happy and healthy New Year and lots of creative fun too!

 
I've been busy making birthday cards again as there are quite a few at this time of year. 

 
First of all my darling sister Juliet had one of those big ones with a nought on the end so I had to make something special for her.

 
She visited Provence last summer to see the lavender fields and sent me a lovely postcard with a similar image to this on it.


So I decided to turn it into a 3D version with all these layers building up to a beautiful view across towards the mountains.  I finished up by sticking on a few dried lavender stalks up the sides which smelt wonderful.

 
Grandson Jimmy's birthday is in January and as he's only 3 I don't think he'll get to see this.  He loves dressing up in his pirate outfit so I hope this will make him smile with the parrot hanging down teasing the crocodile!

 
Bob's birthday is on Christmas day and I made this in honour of the new garden sheds we built this year in the garden.  I copied the tools in 3 layers and used orange card to make the frame.  He was very pleased and surprised when he opened it!

Monday 22 December 2014

CHRISTMAS CARDS 3


For this post I'm bringing together all the images I drew for last year's cards.


I bought a lovely book of Scandinavian costumes when we were in Sweden in 2012.


I had a great time going through it looking for suitable images and copied them into my big sketchbook before choosing the ones I liked best for my cards.


With about 40 cards to produce I had to find a way to simplify the process so I made tracings, printed the outlines, coloured in the complicated bits and rescanned them ready to be printed on cartridge paper.


Then it was just a case of sitting down with my pens and markers and filling in the larger spaces before sticking them onto coloured cards.I really enjoyed doing these as they remind me of the national costume dolls I had as a child in Sweden.
I hope you've enjoyed seeing the rest of the collection too!

Friday 19 December 2014

CHRISTMAS CARDS 2

 
Episode 2 of my home made Christmas cards takes us to China.
 
 
My Belarussian friend Luba, who was the MD of the state fashion industry had many good connections, one of them being the Chinese ambassador.  When he gave her a calendar depicting the many regional costumes of his country she very kindly passed it on to me.
 
 
I spent many happy hours studying and copying the images into my sketchbook and then decided to use them for my cards for 2011 and 2012.
 
 
I devised a method of printing the outlines with some of the more complicated colours finished and then hand painted the main colours in watercolour or indian ink as well as some iridescent paints I found in my materials store.
 
 
I had to trace the Chinese calligraphy as the lines were very difficult to get right freehand!
 
 
There are still several more costumes on the calendar so maybe in future my friends and family will get some more Chinese cards to add to their collections.  ???   Let me know what you think!
I'm going to post the sketchbook pages on my Facebook page for Colours in the Breizh if you want to see more.
 

Wednesday 17 December 2014

CHRISTMAS CARDS

 
It's that time of year again and I've been very busy writing my Christmas cards. 
 
 
When we first came to France I had a good supply of printed cards from my years as a card sales agent in England so I didn't find out straight away that the French are not big card senders.
 
 
When I went to buy some I couldn't find anything suitable so I decided to start designing and painting my own.  I searched my photos for suitable images and came up with the pictures taken at the summer festival in Perros.
 
 
I made copies in my sketchbook and them transferred the images to drawing paper.  I simplified the figures to make them easier to reproduce in quantity.
 
 
Then I had a lot of fun painting them in various colours, using brush pens and markers.
 
 
I purchased ready made blank cards with matching envelopes from the local stationery store and stuck my pictures on to them
 
 
I had a lot of fun doing this and trying to match pictures to recipients when I started on the writing.
 
 
For the message on the inside I wrote the words with a red or black calligraphy pen depending on the colour of the card.
 
 
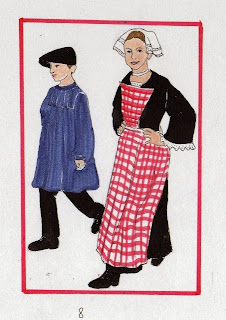
I think all my friends and family like to receive thes hand made specials and now the challenge is to come up with something different every year. These Breton costumes were my cards for 2009.

Thursday 11 December 2014

SKETCHBOOK 28 CATCH-UP

 
I've been scribbling away for weeks in my current sketchbook, no 28, and forgetting to post the pictures on my blog, although some of you who are facebook friends will have seen some of these already.
 
 
I have started a new Facebook page, open to all, with the same name as the blog where you can keep up to date with my drawings as I do them.  I have tried to do the link but I can't seem to copy the address from facebook's little box!  If you are on Facebook just type in the name 'Colours in the Breizh' and I hope you'll get there! 
 And please don't forget to 'like' the pictures so I know you've been to have a look!
 
 
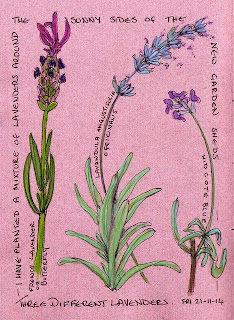
This sketchbook is one I made in the double pamphlet style with a mixture of odd papers in my (rather large) collection as well as a set of samples from Strathmore.  I also found an old book of pastel papers that I didn't like very much.
 
 
But now they are all bound in a book I have challenged myself to use the colours as they come and try to co-ordinate the colours of the drawings.  By that I mean I didn't want to jump pages just because I didn't like the colour.
 
 
These Ingres papers have really grown on me as they are perfect for coloured pencil, just because the label says it's for pastels doesn't mean they are they only medium you can use, besides I do not like pastels because they are so messy!
 
 
I've used a mixture of Inktense and Museum pencils as well as different pens including a white Pentel pigment gel ink pen with a 1.0 mm ball tip.  I've found it to be the best for strength of colour and longevity.  Cheaper ones dry out before the ink is all used up.


I have left out a few of the less successful drawings done for practise with the Derwent line painters as I think I need to work on using them a bit more! 
Hope you've enjoyed this little ramble, I do love to read your comments so please keep them coming!


Sunday 7 December 2014

MORE PORTRAITS: JIMMY

 
After posting all the portraits of my granddaughters I thought it was time to complete the set with some pictures of Jimmy my grandson.  Here he is only a few hours old drawn for his dad's birthday card in 2012.  I used my Pablo coloured pencils on a smooth paper.
 
 
I went to stay with the new little family a couple of weeks later and had lots of opportunities to sketch him while he slept. This is in a tiny moleskine sketchbook which I always kept in my handbag.
 
 
Jo is a lovely mum to her new baby, putting in a lot of effort to feed him when he was tiny and now he's a good eater, loves his food!
 
 
8 months later I returned for another visit and found a lively little boy who was only still when he was asleep. This was drawn while we were driving home after a shopping trip. 
 
 
Another visit and another car sketch but this time they came here to France and we had so much fun together that I only managed this one on the way to the airport for their return flight.
 
 
This was drawn for Jo's birthday in 2013 from a lovely photo I took while they were here earlier in the year.  This time I used ingres paper and a venetian red and a white drawing pencil.
 
 
The latest portrait was drawn this year for Jimmy's dad James's birthday and already he has changed since having his golden curls cut off so that now he looks like a proper little boy.  I'll soon be looking out for another photo to keep up with the changes that happen so fast at this age!

Monday 1 December 2014

EARLY PORTRAITS

 
I've searched out my old portraits from my archives and here is one of the earliest of Kirsty, drawn in a sketchbook in coloured pencil.  I copied a photo taken during the family holiday.


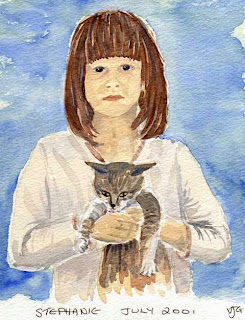
The two eldest used to come and stay with us soon after Sarah was born to give their mum a break.  Here's Steph done in watercolour when she was 4 years old.  We used to have a lot of fun painting in the spare room in our house in England.  I well remember Kirsty making a sign for the door saying  'Mrs Gardiner's art class!'
 
 
I started to draw in graphite after we came to France and had more time to spend trying to perfect my technique.
 
 
Then I discovered Conté pencils, a sort of cross between pastel or charcoal and graphite so I bought a selection of the colours which range through earths to black and white.
 
 
You can see I've gone a bit over the top with the smudging here and I soon decided that anything that leaves a residue or powdery dust is not for me. Also these kind of drawings are quite difficult to keep in good condition as the marks continue to smudge even after fixing.
 
 
So I went back to my watercolours and produced a nice set for 2007.


I've just looked in the sketchbook of the time and found the original drawings I did before these paintings which I had completely forgotten about till now!
 
 
I find that each time I redraw the image I can make improvements and also to loosen up when I start painting, something I find rather difficult being a bit of a perfectionist!
 
 
By 2008 I was back with the graphite and I'd found a way to improve the likeness. 
I trace the outlines of the person on a photo and then I scan the tracing into the computer.Then I enlarge the tracing to about A4 size and print it off on thin computer paper.
 
 
  It's a simple matter then of transferring the image onto my drawing paper by laying a sheet of wax free transfer paper under the picture and drawing the lines with an embossing tool.  The transfer paper I use is made by Saral and comes in 5 colours, red, yellow, blue, white and graphite. 
 
 
The different colours are especially handy when I want to use a tinted paper and the graphite one can be carefully erased so that only the lightest outline shows. 
I hope you've enjoyed my little trip down memory lane and I do love to hear what you think and please let me know if you're unsure of the technique and want to know more.