Pages

Thursday 30 August 2018

CONFETTI QUILTING

 
The September challenge in the Postcard fabric art Facebook group is inspired by the art of Leonid Afremov and the colours blue and yellow, theme of landscape and using confetti quilting technique.
 
 
I had a search online for the confetti idea, watched a couple of videos, and soon I was rummaging in my scrap bags looking for suitable fabrics to cut up.


Luckily I'm a tidy person and each colour had it's own bag which made the selection a lot easier.

 
I decided to use water soluble stabiliser to mount the confetti on to and as I have two sorts I put the opaque one on the base and the transparent one on top so I could see where I was stitching.

 
The idea is that you sandwich all the scraps between the layers of stabiliser and free motion stitch all over to make sure all the bits of fabric are attached to each other.

 
Before long I realised I needed to put in a lot more pins all over the piece as when I moved it about on the sewing machine the scraps collected in one place instead of being spread out!

 
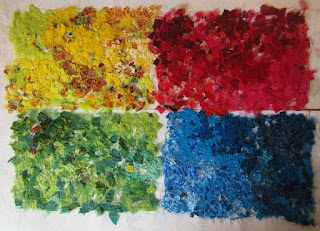
I decided to make some red and green confetti as well so that I can use it for various projects in the future.

 
What a fun afternoon, stitching like crazy then running to the bathroom to wash away the stabiliser and see what I had made!

 
And here are the finished sheets all A4 sized, dried and ready to use when I find my subject. 
We're off on our next camping car trip tomorrow so I will be sketching views of Brittany as we travel around and hopefully one of them will be suitable for the confetti stitchpic treatment.
Watch this space in a couple of weeks for episode 2 of the September Postcard fabric art challenge!

Tuesday 28 August 2018

ANOTHER SET OF PORTRAITS

 
My portrait project is growing and I've hand stitched another six pictures during the summer.
Here is Kirsty with her lovely red hair which is actually a lot longer than it appears in the picture.

 
My niece Esther was quite difficult to capture, this is the second attempt at her face.

 
My nephew Gregory, son of Rosi who died 15 years ago, has a wonderful head of curly red hair which he is very proud of.  I had a lot of fun stitching it in a mixture of  yarns.

 
This portrait of Steph, my middle granddaughter is a reject, it's not very pretty and her plait is far too dominating.  I've started a new version using a different photo which I'm sure will be more flattering.

 
My brother Chris has white hair like me and a jolly smile.  I used a pale grey linen and monochrome running stitches in different thicknesses.

 
And finally here's a funny one of me, I'm not happy with the likeness so I'll probably try another one for the final quilt.
The main thing with all these portraits is that I am really enjoying working them and the challenge to make the recognisable.

Thursday 23 August 2018

BAGS OF BAGS!

 
After a lovely long hot summer, the weather has changed and rain has come to water the garden and I started to think of making things for next year's garden party.
I have a lovely collection of fabrics given to me by friends and family and it seemed a good idea to make some lingerie bags.
 
 
I had already made these two for Justine to use for her holidays and also seen some pretty ones at an art expo last week so a couple of afternoons work produced what you can see in the top picture.
I appliqued orchids from some organza or broderie anglaise using bondaweb and zigzag stitch to finish the edges.
 
 
Then I used some crinkly brown cotton with a matching print to make a pair of shoe bags which turned out big enough for at least two pairs.


My sister and niece had asked me to make them bags like mine for their birthdays so I set to and made the larger ones you can see here.  They measure approx. 42 cms wide by 26 cms high.

 
There was plenty of fabric left over to make a pair of smaller ones too which measure 30 cms wide and 20 cms high.
 
 
All the bags have internal pockets for pens or phones and a plastic inner base to give support.


I'm really pleased with my rainy day efforts and I'm already planning my next wet weather projects, maybe some sketchbooks.

Wednesday 8 August 2018

PFA AUGUST CHALLENGE

 
This month the challenge on Postcard Fabric Art is the colour orange and the artist Georgia O'Keeffe, famous for her large scale paintings of flowers

 
 I researched the images on the internet and found she had painted a few lilies and as I have a lovely potful on my terrace I knew I could use them as my inspiration.
 
I draw these fragrant blooms every year and I soon found some previous sketches to inspire me as well as going out and sitting by the plant to draw straight away. I am also aware of the copyright laws about using other people's images and there was a very interesting discussion in the group about this  issue.  I am very particular about using only my own drawings or photos or my friend's with her permission.
 
 
I love the way the petals curl and their frilly edges.
 
 
I have made a collection of templates that I use when I start a new project to make sure I work to a standard size, whether to fit a frame or a card to be posted.  I had bought a set of plastic place mats at Lidl but found them far more useful for this purpose as they are easy to cut with scissors or a craft knife.  I place them onto the fabric and lightly draw the boundary of where I want to stitch with a pencil.  Sometimes if I'm using linen with a coarse enough weave I will pull threads along the line to be sure I'm perfectly square.


I made a careful drawing that I could use as a basis for my needlework and made my fabric selection from my collection of organzas, cottons and some vibrant orange jersey given to me by a friend.

 
The base fabric is a plain yellow cotton then there is a layer of pale green organza and a translucent unwoven fabric layer for texture. I cut out each orange jersey petal shape and tacked it on then added a layer of yellow organza to lift the colour and give a bit of a sparkle.  Each petal was then stitched by hand using a red yarn to depict the spots.
 
 
After I finished stitching on the petals I added the white edges by couching on a line of white cotton knitting yarn which gives the flower a bit of life and dimension.  Then I decided to edge the picture with a line of variegated yarn woven through a line of light green running stitches.
 
 
I finished off with the stamens and stigma using various different yarns but being sure to follow the shape and pattern correctly as I had drawn originally.
 
 
I pinned the picture to a square canvas and used a co-ordinating ribbon round the edge to hide the folds and pins and it is now hanging on my studio wall so I can enjoy it while I decide who will be the lucky recipient.
Here is the link to the PFA group page on Facebook, (fingers crossed it works!)
 

Wednesday 1 August 2018

HOMETOWN CHALLENGE

 
I belong to a Facebook group called Postcard Fabric Art where we are challenged each month to make a postable work of fabric art using the prompts set by Ann Hillman Lamy.  This summer we had an extra challenge, to depict our hometown in any way we wanted.

 
I  like to work from my own source material if at all possible so I started by browsing through my sketchbooks looking for drawings of my home area here in Perros Guirec and came across plenty. They are all done from life, sitting at the harbour or on a fallen log in the case of the woods overlooking the marina.

 
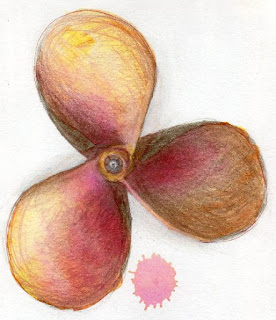
I had drawn the propeller from our yacht after I cleaned and polished it a few years ago before we sold it.

 
I scanned each sketch, printed them on paper, then printed the script and cut out and assembled the pieces till I was happy with the composition and rescanned the sheet ready for the next step.
I bonded a piece of plain white cotton fabric to some vliesofix (bondaweb) and then printed my scanned image on it.

 
Now the fun begins, I found some pretty sky printed fabric in my stash and ironed on the bonded image before I coloured the background and pictures to match the border with my inktense pencils.
I then wetted the pigments with a fabric medium to bring out the colours as I've found that wetting them with water tends to make them run which doesn't happen with the medium.
I started on the embroidery using mainly running stitches to enhance the pictures, above you can see that I've done the right hand side only.


As I worked I started to realise that there were a few gaps that needed a little something extra and came up with the idea of adding the seagull at the top and a puffin which is the mascot of Perros Guirec. 
 Back to the sketchbook and a search through some photos and I made some more drawings to trace onto the vliesofix, iron onto fabric, cut out and stick to the picture.

 
As you can see they made the picture complete after a bit more embroidery. The border finishes it all off nicely, for that I did a line of running stitches in a blue thread  along the edge of the top layer of fabric and then wove the turquoise yarn through the stitches.  The whole picture measures 21 x 30 centimetres, just the right size to fit in an A4 envelope or frame. 
I hope you've enjoyed seeing my process and maybe have a go yourself!