Pages

Sunday, 26 April 2020

POSTCARD FABRIC ART THE NEXT 4 MONTHS


It's a while since my last post so I thought I had better do a bit of catching up. 
I posted the January challenge earlier in the year and here are the next four months pieces, starting with February.  The theme was ancient Rome and Greece so I thought of the Greek goddesses and Aphrodite came to mind along with the Acropolis in the city of Athens.  I found an image which I traced onto a piece of sky printed fabric and as I wanted the picture to be a standard 30 x 20 cms I decided to add the greek key pattern along the top and bottom and machine embroidered then coloured with inktense pencils.  For my goddess I have a photo of my granddaughter dressed like this which I copied onto piece of flesh coloured linen then added her clothes and hair with applique and embroidery. I cut her out carefully and hand appliqueed her to thebackground and finally made a frame with a navy heart printed fabric.


The subject for March was the Mediaeval era and I started thinking of some of the ancient castles we've visited here in France.  Carcassonne is one of my favourites so I found one of my drawings and transferred it to some beige linen before machine embroidering the outlines, then colouring with my Inktense crayons which I wetted with fabric medium.  The figure is an applique of different silk fabrics with hand embroidered gold threads and details, then the picture finished with a frame of batik in deep red and russet colours.


April's theme was the Renaissance and after studying some paintings of the era I remembered I had an old duvet cover printed with just the right kind of images for my background.  For my figure Elizabeth I was the perfect example with her fabulous clothes, all appliqued in silks and lace with red yarn for her hair and red beads stitched for decoration.  The frame is a lovely gold printed royal blue, ideal for the regal image.


The latest theme for May is the 1920s and I soon came up with a plan using a beautiful art Deco fabric as the frame and also printed on paper in light blue for the background.  I overprinted the blue art deco with an image traced from a costumes through the ages book then layered a piece of white organdie, then the print and then some blue coloured netting to complete the background.


Here I have machine embroidered most of the ladies in black thread but my machine suddenly stopped working in mid flow.  


You can see from the back of the picture that I had to stop on the third ladie's arm.  Fortunately Bob is an electronics engineer and after completely dismantling and reassembling the machine she is now in perfect working order. He said how lucky I am to have such a useful husband!  I'm lucky too that my beloved Bernina has lasted 30 years with no trouble at all till I overworked her!


So the rest of the picture was done with hand stitching to make the costume of the main character and here are the ingredients before I started. She was traced onto organdie backed with fine interfacing and various scraps appliqueed for her coat, dress and hat with beads added later for a necklace.


The finished front of the piece measuring 30 x 20 cms with the picture stitched to the frame.


For the reverse I embroidered the caption on organdie so that the stitching on the back was just visible and added a couple of cut out shapes from another fabric scrap.


I have now joined the first 4 pieces with split rings passed through eyelets on each corner and hung them on a net curtain hanger in my studio.
  I'm thinking maybe this will turn into a much larger wall hanging so watch this space!


Saturday, 22 February 2020

A DAY OF WEAVING


Last week I treated myself to a day of one on one tuition with Georgette Meyer, a weaver I met at an art exhibition last November.  She lives about an hour away in a pretty house in the countryside with her studio in a separate building.

I was shown around her studio which houses three looms of varying sizes and an incredible stash of yarns in all colours, piles of finished blankets and mountains of works in progress!


Georgette started me on the smallest loom and explained the basics of weaving with 4 heddles, the parts of the loom used to make different patterns, operated by 4 pedals.  It took me a while to get the hang of using my feet to press down on the different combinations to make the designs.  I had to borrow a pair of thick socks so I could easily slip my feet left and right to change pedals.


I was using a boat shuttle that holds a bobbin of yarn to make the wefts, it's easy to change colours in this way as you just lift out the bobbin and put in a different one when you've used up the previous one.


Georgette was a patient teacher and demonstrated the different patterns then left me to play till I got it right!  We added lots of different textured wools and even a twig from the garden.


I couldn't stop smiling all day and even had a little tear in my eye when the chevrons I'd been working on suddenly came through correctly. The day included a delicious lunch cooked by Louis, Georgette's husband and although I was tired by 5 o'clock I didn't want it to end.


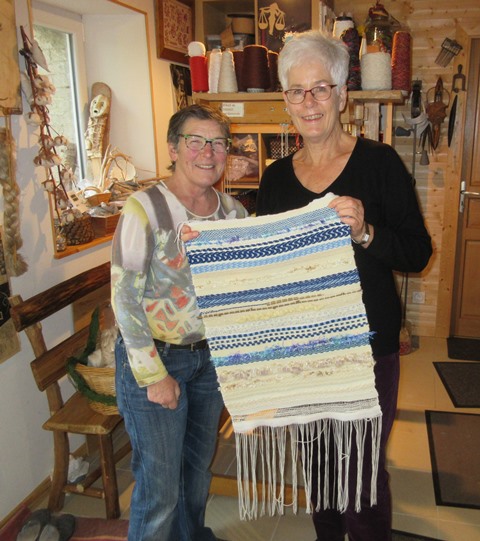
Here we are posing with my day's work, a beautiful wall hanging that just needs the fringe knotting and a twig to hang it from to be complete.


 Here it is, now hanging in the lounge at home.


Of course I had to have a go when I came home and I've had a lot of fun on my frame loom playing with my yarn stash and practising the various weave patterns.  I had picked out these colours after seeing a beautiful dawn sky.


Now I'm wondering what to do with these pretty pieces, I haven't got room to make them all into hangings so maybe I'll cut them up to make into cards for birthdays or Christmas cards.  I've got a box full of these hot colours so I've plenty to keep me busy!

Saturday, 4 January 2020

PFA 2020 JANUARY CHALLENGE


Happy New Year to you all, hope you had a good holiday season. 
I'm starting the year with the January challenge for the Postcard Fabric Art group I belong to where this year's theme is historical centuries.
The first is Ancient Egypt and I have decided to make fashion my focus for the year.


I started by searching out my photos and souvenirs from our visit to Egypt 12 years ago, along with some useful magazines I kept with pictures from the tombs.


I chose this image of a goddess painted in the tomb of Tutankhamon as her dress looked very interesting, close fitting with what looks like a pleated sash.


I decided to make an inscription in hieroglyphics and copied some of the above symbols to hand stitch onto my piece of fine organza.


I used this transparent fabric so that I could mount it on top of  the sheet of papyrus I planned for the background.


I found another tomb painting and using my lightbox I traced some of the outlines onto the papyrus, which wasn't easy because of the ridges in the texture of the grasses used to make this ancient type of paper.


Next I traced the goddess onto a piece of felt that I layered with some red organza to make that reddish skin tone.  I used bondaweb to adhere some fine white linen for her dress and head band, then started to embroider the details.


Her wig is a piece of black felt stuck on and the sash is a length of red ribbon embroidered to depict the pleats. Next I bondawebbed her to the organza background ready for the assembly later.


I was lucky enough to find a piece of Egyptian themed fabric in my stash so I interfaced it for stiffness and made it into a double sided frame to support the layers of my design.  Onto the back I hand stitched the caption on organdie then attached it inside the edges.


Finally I inserted the papyrus and then the organza with the goddess into the frame and stitched the edge to hold them all together.  I really like how the papyrus drawing shows through the organza and I wonder if you can work out what the hieroglyphs say?


Saturday, 14 December 2019

50 SKETCHBOOKS!


I can't quite believe it myself but I've just started my 50th sketchbook in 19 years.
I've decided to dedicate it to the trees in my garden which have grown up with us during our life here in France for the last 16 years.  I'm using an old spiral bound book which has had half of the pages taken out so that there is enough space to allow for extra pieces of paper and fabric to be added in.


I began with my favourite trees, the three silver birches in the front garden which we planted not long after we arrived in 2003.  I've drawn them many times over the last few years and now they are the tallest trees we have, enjoyed by all the birds that sit there to sing or watch the sun rise.


After an autumn shower the delicate hanging branches hold the raindrops that glitter in the sun low in the sky at this time of year.  I've captured this lovely sight on crumpled pastel paper in soft drawing pencils.


Then I made a stitched version of the view using a scrap of textured black fabric, layered with organza and stitched in assorted threads and yarns.  I love making French knots for the sparkles!


A detailed drawing of the delicate twigs with a background of distant autumnal trees.


I took a few photos one day and made this drawing, again on crumpled paper using graphitint watersoluble pencils.  It's surprising how many colours you can see if you look more closely at something.


This drawing is of a piece of bark that fell off the tree last year and kept in my nature collection drawer ready to be drawn when the mood took me.


I made this stitched version of the bark on a printed cotton scrap, layered with odd bits of silk and organza for the texture.  I enjoyed interpreting the markings in different coloured threads and couched on woollen yarns.


A few metres away from the silver birches stands the pine tree, which came home as a small lollipop shaped sapling in the back of the car.  Now it looks ancient with a thick trunk covered in deeply textured bark and wounds where we've had to cut off low branches.  I made this drawing last year, sitting on the bank next to the tree and using a fine black pen.


I traced the drawing onto white cotton organdie and stitched the lines in fine black thread.  There's a gap down the middle because I had to split the picture to spread it over a pair of pages.


I made rubbings and took lots of close up photos of the pine bark and here is my interpretation of a small section.  I find the shapes quite fascinating, those bits that look like nipples are where tiny twigs grew out of the trunk.


So of course I had to find a way to interpret this in fabric and thread and found some thickish black backed jersey fabric in grey and brown which I cut into shapes and appliqued together with various threads and couched yarns.


This is the embroidered cover I've made to go over the original book, bark printed fabric coloured with inktense pencils.  The writing goes vertically along the spine but I can't seem tomake this photo turn.
I have a couple more trees to draw and stitch so I'll be seeing you again soon.
Have a happy Christmas and an excellent creative New Year!


Saturday, 9 November 2019

ESTHER'S PORTRAIT


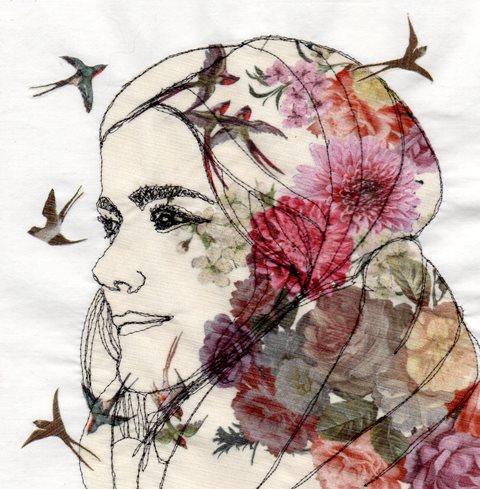
Today is my niece Esther's birthday and I'm celebrating with this portrait inspired by a photo I took of her posing by her graffiti earlier this year.


Esther is a talented artist mainly working in acrylics and one day last winter she went out with some spray paints and produced this self portrait on a rail footbridge near her home.


I started by printing out the photo and tracing her outline, then found this beautiful chiffon fabric in my stash.


I attached bondaweb to the back, cut out the image using the traced outline then ironed it onto a piece of white cotton fabric.  Next I used my lightbox to transfer the picture to the chiffon in a pen that disappears when heat is applied.  As you can see I carefully positioned the portrait using the printed image to make the most of the flowers and birds. 


I stretched the fabric in my large embroidery ring and started to free machine stitch on the lines I had drawn using a fine nylon thread, the sort normally used for invisible hems in manufactured clothes.  I chose this thread as it has a softer look than normal black cotton.  After I had finished the stitching I decided to cut out a few of the swallows from the spare fabric to iron on around the portrait as they all had bondaweb on the back, making it very easy.


Here's the back of the portrait which I think is just as pretty.


I decided to have a go at making a portrait of Esther's brother Sebastian in the same style.  I love how the birds appeared on his face especially as he is keen on travel and has flown the nest several times already in his life.


The machine embroidery in progress on my beloved Bernina.


Like Esther's portrait I added some extra birds flying out, can you just imagine what's going on in his mind, where to next?  The photo this was inspired by was taken when he was travelling in Cambodia.