Pages

Showing posts with label hand embroidery.. Show all posts

Saturday, 27 February 2021

3 SILVER BIRCHES


My latest wall hanging is a felted and hand embroidered depiction of the three silver birches growing in our garden.  We planted them about 16 years ago and as they are visible from my kitchen window I'm always observing the changes through the seasons and over the years.  I've sketched and painted them many times as they have grown but this is their first incarnation in stitch.


I started with a base made of coloured wool tops which I had bought a few years ago when I thought I would try my hand at felting.
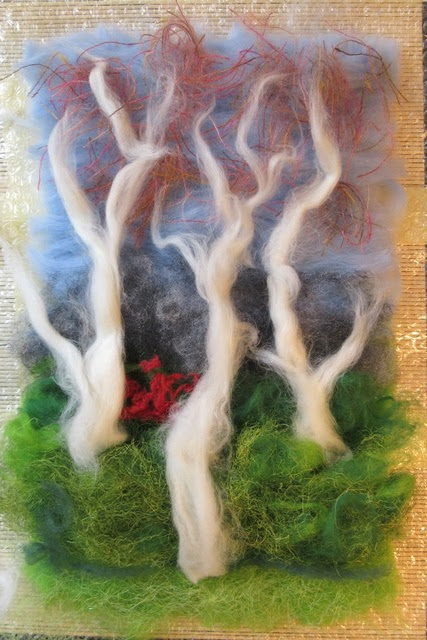

 I built up the layers using appropriate colours and pulling the wisps apart to make the shapes I required and added some chopped up pieces of mohair and silk yarn for the twiggy bits at the top of the branches At this stage the image is very loose and fluffy.


 I then began the felting process which involves wetting the piece, rubbing soap all over, covering it with nylon net curtain, wrapping in bubble wrap and then spending about 15 minutes massaging and turning the piece around until all the wool has begun to blend together.


Then I rolled it up in a bamboo place mat and rolled it in all directions till the felting process was complete, another 15 minutes of rolling and rinsing in hot water to remove the soap and I ended up with a piece of felt quite a bit smaller than I had started with.  I put it in a warm place to dry ready for the next step.


I started to hand stitch the details on the trunks, shrubs and distant trees.


I decided to extend the piece with another piece of felt which I prepared and then attached by extending the branches beyond the edge of the first part.


This picture shows some of the equipment necessary to do the felting, the original photo of the trees and the work in process.


A close up of the felted on yarns of the extension ready to be joined to the bottom part of the picture.


It's nearly finished and now all I had to do was add some extra long branches to use to tie to the twig I cut from a fallen branch of the tree to make the wall hanging you can see at the top of this story.
I hope you've enjoyed reading this description of my work and maybe you'll think of having a go at felting too, just remember the yarns must be wool to be sure they blend together in the felting process.


Sunday, 3 January 2021

PFA 2020 COMPLETED WALLHANGING


Here at last is my completed 2020 Postcard Fabric Art challenge wall hanging.  Each A4 sized card has an eyelet in each corner so that they can be joined to form this piece measuring 85 x 90 cms now hanging in my entrance hall.


Following on from my last post in the summer the next month was June and the 1930s theme.  I chose to highlight the inventer of the A to Z of London, Phyllis Pearsall, a publication which made a huge difference to my life as a representative driving around the city and the rest of the country.


In July the 1940s and the Women's Land Army became my focus and especially as my mother worked there in her twenties during the war and wore this particular uniform.


The 1950s in August and the fashions of Christian Dior were a highlight. My mother became a mum to me in Sweden where she was living at the time with my dad, and as she was a dressmaker I could imagine her sewing and wearing a dress like this.


The 1960s was the subject in September and my time at art college became the theme.  I printed a page from my sketchbook, collaged a handful of images and hand stitched my portraits of the time in black thread.


In the 1970s for October I chose the start of my married life with Bob and the setting up of our home together.


In November the 1980s and 1990s saw us working hard to save for our boat and enjoying our spare time sailing around the south of England and across the channel.  This piece started as another group's  challenge during the lockdown in spring and then seemed perfect for this month's card.


In December we were challenged to come up with an idea for the 2000s and beyond and our life since we retired here in France in 2003 was a perfect choice as the subject.  We bought a camping car and spent our holidays exploring our new country as well as further afield in Spain and Sweden where we searched out my birthplace.
All the pieces in this collection were made using fabric collage and hand and machine embroidery.  I'm lucky to have a large stash of assorted fabric to choose from to make the appropriate parts and frames for the pictures.
I also want to thank Ann Hillman Lamy for her original idea for this wonderful group which works so well with people around the world sharing their work and inspiring each other. In 2021 we have a whole new set of challenges to try so maybe I'll share some of them here in the future.


Sunday, 13 December 2020

TREES, TREES, TREES!


Did I ever tell you that I have always loved trees? 
I love to observe them in their natural habitat and to interpret them in drawing and stitch.
We have a deodara tree in our front garden, first planted about 15 years ago that is now nearly as tall as our house.  This year I decided to make images of it for my family Christmas cards.


These first two are free machine embroidered in three different greens on some sun printed fabrics.


This is hand embroidered in thick yarns on to a black linen background.


The background for this one is something I made a few years ago, dyed interfacing that went all crinkly and produced those lovely lines that look like a wintry forest.


Earlier this year during the lockdown I decided to make a little wall hanging from a photo of trees taken at an arboretum I visited with Justine last year, it's woven on a small pin loom.


My granddaughter Sarah is also passionate about trees so I made her a woven tapestry cushion cover with a forest on the front.


Last year I used another photo taken at Winkworth arboretum to make this autumnal tapestry.


This is an earlier attempt at embroidered weaving, it's a bit rough but was useful as a learning process.


When we go away in our camping car I'm always on the look out for interesting trees to depict in hand stitching, done while we're away as a sort of postcard to myself. There are lots more but I'll post them another day.  
Have a very happy, safe Christmas and lets hope for a much better 2021.


Sunday, 26 April 2020

POSTCARD FABRIC ART THE NEXT 4 MONTHS


It's a while since my last post so I thought I had better do a bit of catching up. 
I posted the January challenge earlier in the year and here are the next four months pieces, starting with February.  The theme was ancient Rome and Greece so I thought of the Greek goddesses and Aphrodite came to mind along with the Acropolis in the city of Athens.  I found an image which I traced onto a piece of sky printed fabric and as I wanted the picture to be a standard 30 x 20 cms I decided to add the greek key pattern along the top and bottom and machine embroidered then coloured with inktense pencils.  For my goddess I have a photo of my granddaughter dressed like this which I copied onto piece of flesh coloured linen then added her clothes and hair with applique and embroidery. I cut her out carefully and hand appliqueed her to thebackground and finally made a frame with a navy heart printed fabric.


The subject for March was the Mediaeval era and I started thinking of some of the ancient castles we've visited here in France.  Carcassonne is one of my favourites so I found one of my drawings and transferred it to some beige linen before machine embroidering the outlines, then colouring with my Inktense crayons which I wetted with fabric medium.  The figure is an applique of different silk fabrics with hand embroidered gold threads and details, then the picture finished with a frame of batik in deep red and russet colours.


April's theme was the Renaissance and after studying some paintings of the era I remembered I had an old duvet cover printed with just the right kind of images for my background.  For my figure Elizabeth I was the perfect example with her fabulous clothes, all appliqued in silks and lace with red yarn for her hair and red beads stitched for decoration.  The frame is a lovely gold printed royal blue, ideal for the regal image.


The latest theme for May is the 1920s and I soon came up with a plan using a beautiful art Deco fabric as the frame and also printed on paper in light blue for the background.  I overprinted the blue art deco with an image traced from a costumes through the ages book then layered a piece of white organdie, then the print and then some blue coloured netting to complete the background.


Here I have machine embroidered most of the ladies in black thread but my machine suddenly stopped working in mid flow.  


You can see from the back of the picture that I had to stop on the third ladie's arm.  Fortunately Bob is an electronics engineer and after completely dismantling and reassembling the machine she is now in perfect working order. He said how lucky I am to have such a useful husband!  I'm lucky too that my beloved Bernina has lasted 30 years with no trouble at all till I overworked her!


So the rest of the picture was done with hand stitching to make the costume of the main character and here are the ingredients before I started. She was traced onto organdie backed with fine interfacing and various scraps appliqueed for her coat, dress and hat with beads added later for a necklace.


The finished front of the piece measuring 30 x 20 cms with the picture stitched to the frame.


For the reverse I embroidered the caption on organdie so that the stitching on the back was just visible and added a couple of cut out shapes from another fabric scrap.


I have now joined the first 4 pieces with split rings passed through eyelets on each corner and hung them on a net curtain hanger in my studio.
  I'm thinking maybe this will turn into a much larger wall hanging so watch this space!


Saturday, 6 April 2019

WINTER HOLIDAYS 2019

 
We had 2 lovely sunny weeks at Los Cristianos on Tenerife in a comfortable modern hotel overlooking the harbour and bay.

I took some embroidery supplies with me so that I could sit and stitch in the sun.
I was inspired by the cacti used to decorate the public areas of the hotel combined a couple of sketches for this one.
 
 
There was a nice pool area with plenty of interesting trees and plants to draw.

 
I took a handful of inktense crayons and some water soluble Triplus pens so I was very happy sitting for the afternoon drawing what was in front of me.

 
These pots of cacti were on the roof of the hotel in a chill out zone where we could relax on big sofas and sun loungers with extra cushions.

 
The cactus bar had it's 6 foot high symbol in a huge pot.

 
While we were there I went to the market to say hello to Sharon and buy a few more of her beautiful sarongs. She was delighted to see what I had made in previous years and I've promised to email her a picture of my next creations.

 
My final stitch pic is an interpretation of the view from our balcony at sunset.  I re-cycled lots of bits like the ribbon from a basket of goodies from the hotel, a cord from a sun-hat and the sun is cut from a perfume sample card.
We're already thinking  of our next trip, a cruise to the cities of the Baltic in May and I'm planning to make a sketchbook to record the journey.

Saturday, 1 December 2018

PORTRAIT OF ESTHER


At last I have completed the stitched picture of my niece Esther.  She is an enigmatic soul with a big heart and I wanted to capture that spirit in this portrait.
 
 
I clipped this picture from a recent photo to use as the basis.
 
 
The first step is to print out the photo to the required size which I then tape to my led light box.

 
I lay a piece of cotton organdie on top and draw the outline in erasable gel pen that disappears when I iron the finished piece.

The next step is to choose the background fabric and the colours I want to use for the stitching.
I found this lovely colourful batik in my collection and some pieces of bronze and blue organza to use to give depth to her hair.

 
Here is the portrait after the initial stitching has been completed. I've used running stitch for the hair in different shades of brown, backstitch for the outline and satin stitch for her lips. 
The next step is to interface the face area with some iron on interfacing, I use a very fine woven cotton one as it works well with the cotton organdie.

 
I use the light box again to trace Esther's name and birthday along the sides and mark where the boundary of the portrait will be.
Now the fun starts, I pin and tack the portrait to the background and start the decoration by stitching through both layers following the patterns on the background. Then I made a line of running stitch on the boundary which I whipped with a contrasting thread.

 
Finally I carefully trimmed away the excess organdie and then I decided to re-stitch the script in a stronger colour as the pale colour didn't stand out enough.
I've used this method on several of my family portraits now and soon they will all be assembled into a wall hanging to celebrate the centenary of my mother's birth next year.