Pages

Saturday, 28 November 2015

MUSHROOM PICTURE FINISHED

 
After a couple of weeks drawing a collection of mushrooms from different sources as you have seen from the previous two blogs I finally put them all together in the big frame to hang in my kitchen.

 
I wanted a different shape for the middle of the picture so...


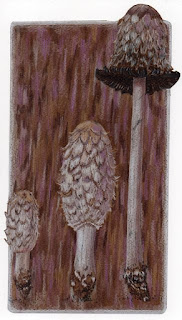
I re-cycled this ink cap drawing that I did a couple of years ago, cutting off the edge and re-doing the background.


Then I found this one and decided it would complete the set if I trimmed off the surplus and added a few autumn leaves.

 
I'm rather pleased with the result and I hope you like it too, it's a nice change to see something new in the kitchen when I come down in the morning!

Saturday, 21 November 2015

MAD ABOUT MUSHROOMS PART 2

 
I've had  a lovely week drawing more mushrooms, this first one is almost the size of a plate, found in  the forests of Brittany by Luba and HervĂ© a few weeks ago. They picked so many in one day that she had to preserve most of them by freezing of drying and pickling in brine.
 
 
Here is a photo of their finds from one days foraging.  Lots of boletus and tiny chanterelles which were delicious in a tart she made for our supper one evening.

 
But back to Belarus and here are a pair of strange ones with yellow heads and speckled black and white stems. I  used my Derwent drawing pencils for this one, they are a lovely collection of earthy colours with muted greens and greys.  The leads are soft and creamy and work beautifully on the mi-tientes paper.

 
Last night I copied a photo taken by my sister in law Trish in her local West Sussex woods.  I drew it last year in my sketchbook and it was nice to do it again on pastel paper with Pablo pencils which are smooth and fine and lovely for mixing in layers.  I left the test swatch on the side so you can see the different colours I have used.  The light wasn't very good so I had to guess if I was using the right shade and it was a lovely surprise this morning to see it in daylight although I did have to erase and replace a bit of rather bright blue that had got in which didn't work at all! 
 In case you're wondering, the best way to erase coloured pencil is to use a putty rubber in a dabbing motion because if you rub you will spread the colour into other areas and dirty the colours.
Next time I hope I will be showing you the finished picture.

Monday, 16 November 2015

MAD ABOUT MUSHROOMS

 
I've had a lot of fun this week working through Luba's mushroom photos.  Here is the first one I chose to draw in my sketchbook, I've used a bit of artistic licence with the colours and the paper just happened to be this gorgeous shade of raspberry at the end of my book!

 
Then I thought why not try to make use of these pictures for a larger painting as I have a framed print in the kitchen that's in need of changing and the frame is in good condition.  I measured up and worked out that I could put 12 drawings measuring 14 x 15 centimetres on one background.

 
I'm really not that comfortable with big paper so the idea of lots of little drawings appeals to me.  I sorted out a stack of different colours and started drawing.  This red spotty one I found while out walking on Wednesday was perfect to get me started and the green picture above I copied from a photo I took last week.

 
Here are Luba's forest ones again, drawn in Derwent line painters and a white gel pen.

 
This strange sombrero shaped one took a long time with all that stippling but I think it was worth the effort, especially as I had already drawn it once in the sketchbook!

 
And finally the finished page in the sketchbook where I decided to add the forest in the background as it was in the photo. 
I hope you've enjoyed the start of my new project and will visit again soon to see part 2!

Friday, 6 November 2015

A NEW STYLE

 
I've rediscovered my Inktense blocks and pencils thanks to my friend Jacqueline Holmgren in Sweden.  She's the lady I met in Norrkoping whose sister worked for my father in the 1960s.  She is an amazing artist, specialising in acrylics and collage, how I wish I could attend some of her classes, they look so exciting when she shares them on Facebook. 

 
However, last weekend she posted her latest videos and I was hooked!  I had bought some inktense blocks a few years ago to complement the pencils which I have been using for a while, although the Museum pencils seem to have been top of the pile since I discovered them 3 years ago!
 
 
I hope this link will work as I'm sure you'll be as inspired as me when you see what can be done.  One of the most important tips was to use gloves as the blocks really are very messy to use.  The second video in the set is on the pencils which is also excellent as it shows some good ideas and although on fabric, the method is the same as on paper.


So, having seen all this I got stuck in and look what I've achieved!  Some very loose paintings on watercolour paper, larger than I would normally attempt and quite liberating  as I worked standing up, splashing water around and getting through lots of kitchen paper.  I had to be quite patient as well and take tea breaks to let the paper dry between layers otherwise the pigments turn into mud!

 
This is the first attempt in my sketchbook before I started on the loose paper.  I was copying a photo taken by Luba, my Belarussian friend who's grown up with wild mushrooms so she knows a good one when she sees it!

 
Here's a sketch I did earlier in the week and as you can see it's still in the rather careful style of before. 
I wonder how long I'll be able to hang on to this looseness before reverting to normal?