Pages

Monday, 31 December 2018

NEW YEAR, NEW DIRECTIONS

 
It all started when I heard a feature on radio 4 about Anni Albers, a 20th century weaver. 

 
I looked on the internet for more information and discovered there was to be an exhibition of her life's work at the Tate Modern.  As I planned to be visiting the family in England during October I knew I had to go and see this new to me craft.

 
I arranged a day out in London with a friend and what a fantastic day we had.  The exhibition was amazing and we were able to get really close to the weavings and take as many photos as we wanted.

 
The textures and colours Anni combined in her textile arts were a joy to see and the patterns she achieved seemed incredibly complex to our eyes.

 
We saw many of her working drawings and plans for carpets and furnishing fabrics and spent a very happy couple of hours soaking up the inspiration.

 
I have been given a quantity of yarns by a friend who was clearing out a cellar and now I knew what I had to do with them.  In the museum shop there was a small hand loom which I studied carefully and decided that I would get one for myself after my return home.
 
 
I found exactly what I wanted on Amazon for only 35 euros made by the Small Foot Company.
After a practise run with the yarns provided with the loom it was time to make my own picture. 
I decided to make myself some more shuttles as the loom only came with two rather chunky ones.
I bought a length of bevelled hardwood from the DIY store, cut it into 4  pieces and set about making the slots in the ends using Bob's electric drill, a saw and file and sandpaper.  You can see them in this photo at the front.

 
I had been for a walk to the beach on a windy afternoon and still had the image of the waves in my mind's eye so I went in search of suitably coloured yarns in my boxes.  I set up the warp, the longwise threads, using a neutral cotton yarn and wound the different wefts onto the shuttles, and got started on the weaving. 
I found the process very calming as it's impossible to go too fast without making mistakes.  I really enjoyed choosing the mixes of colour, blending in the white for the surf and working out how to make diagonal lines. I soon learned not to pull the yarn too tight at the sides because my edges started to curve inwards.

 
When the background was completed I took it carefully off the loom and attached it to an iron-on interfacing to keep it in shape and to prevent the warps from coming un-woven.  Then I hand embroidered the seagulls and the details on the islands and the beach to complete the picture.
 
 
The final job was to turn the weaving into a cushion cover.
I'm really proud of my first woven project and I've already made another piece but you will have to come back in the new year to see what it is.
Happy new year everyone!
 

Saturday, 15 December 2018

HAPPY CHRISTMAS CARDS

 
Well, it's nearly Christmas and I've been so organised this year that all my cards have been sent and hopefully received by now. I decided to make use of the lovely stash of yarns I was given last year to make something a bit different.

 
I attended a basket weaving class run by my friend Soizic and as it was the season for it she showed us how to make these stars using willow and natural fibres like raffia and fresh grasses.
I drew a diagram that I could refer back to for the process, as you can see it's a thread wrapped around a star base and if you follow the lines it's quite straight forward.  I attached the end on the back using sellotape to stop it slipping and soon got into a rhythm of winding.

 
Here you can see the templates I used to cut out my stars in different coloured card and also some stiff clear plastic sheets made by passing empty laminating sheets through the laminating machine. I also cut out a few stars with pinking shears to stop the yarns sliding on the sides of the stars.

 
I used nearly every yarn in the collection, especially the fluffy white ones which were perfect for the moment on a blue background.
I had ordered a set of pre-folded plain cards and envelopes and I printed the Christmas message inside before I hand stitched each star with a different scrap of texture fabric or organza as a background.

 
I invited some friends round and we spent a lovely afternoon making these and chatting about our Christmases past and present.

 
The girls all went home with lots of star bases and balls of yarn to share with their grandchildren.

 
I hope you've enjoyed this little tutorial and will try this for yourselves.
Finally I wish a Merry Christmas to all my readers and a happy and creative New Year!

Saturday, 8 December 2018

YARNIES FOR JAMES

 
Have you heard of Unravel?  It's a computer game with two delightful characters called Yarnies who travel around their world helping each other to get about.

 
My grandson James and his dad were playing it while I was in England recently and I was really impressed at the pleasure this gave them and me.

 
There is no shooting or killing or loud noises, just a gentle tune playing in the background.

 
James asked me if I could make him some Yarnies and of course I said "yes!"

 
I researched on the internet and discovered that the game originated in Sweden, where I was born so I searched out my sketchbook full of drawings done when I was there in 2012.

 
I used some red and blue electrical wire as the basis of the figures and searched out some red and blue yarns from my stash to wind around .

 
I made their lifelines on the sewing machine by zigzagging 2 threads together to make them strong and doubled back over the ends to reinforce and prevent unravelling.

 
Once they were finished I had a lot of fun photographing them in different poses in my studio.

 
The Yarnies explored the bookcase,
 
 
and climbed over my lamps.


They played with my pens but finally I had to say good bye and designed a card to post them in.
 
 
I found various scraps to make a Christmas tree scene with hand embroidery and lots of glitter.
The support inside is pelmet interfacing which just happened to have the points already cut out.

 
The outside is a spotty satin and I used a piece of red ribbon to make the tie wrap.
 
 
I posted a picture every day on Facebook after I sent the Yarnies off this week, James was thrilled with his gift and sent me a picture back to say thank you.
This has been a different making experience for me and I can honestly say I had a lot of fun with it and especially imagining James's face when he opened the envelope.


Saturday, 1 December 2018

PORTRAIT OF ESTHER


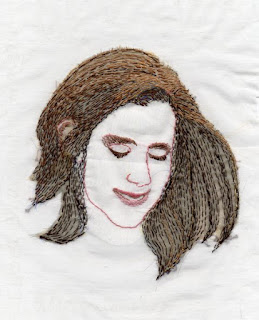
At last I have completed the stitched picture of my niece Esther.  She is an enigmatic soul with a big heart and I wanted to capture that spirit in this portrait.
 
 
I clipped this picture from a recent photo to use as the basis.
 
 
The first step is to print out the photo to the required size which I then tape to my led light box.

 
I lay a piece of cotton organdie on top and draw the outline in erasable gel pen that disappears when I iron the finished piece.

The next step is to choose the background fabric and the colours I want to use for the stitching.
I found this lovely colourful batik in my collection and some pieces of bronze and blue organza to use to give depth to her hair.

 
Here is the portrait after the initial stitching has been completed. I've used running stitch for the hair in different shades of brown, backstitch for the outline and satin stitch for her lips. 
The next step is to interface the face area with some iron on interfacing, I use a very fine woven cotton one as it works well with the cotton organdie.

 
I use the light box again to trace Esther's name and birthday along the sides and mark where the boundary of the portrait will be.
Now the fun starts, I pin and tack the portrait to the background and start the decoration by stitching through both layers following the patterns on the background. Then I made a line of running stitch on the boundary which I whipped with a contrasting thread.

 
Finally I carefully trimmed away the excess organdie and then I decided to re-stitch the script in a stronger colour as the pale colour didn't stand out enough.
I've used this method on several of my family portraits now and soon they will all be assembled into a wall hanging to celebrate the centenary of my mother's birth next year.

Saturday, 17 November 2018

SKETCHBOOK CATCH UP

 
Mushrooms are appearing in my garden and along with the red spotty ones a few golden brown oddities that I've drawn life size here.

 
The pine tree in my garden is very stocky with a wonderfully cracked bark.  I sat on the bank one warm afternoon to draw what I could see and maybe one day make a textile art piece from the image.

 
A piece of bark drawn from both sides, still a work in progress.

 
In England visiting the family we went for a lovely walk on Sunday morning and James and I collected pockets full of chestnuts and leaves to draw and we even ate some of the nuts!

 
While I was at Justine's we walked at Winkworth arboretum which is famous for the collection of Acers.  What pleasure to collect all the lovely red leaves and spend the time to draw them;


Another Sunday and a walk near the river at Guildford where we found a hop plant covered in fruit.

 
James is becoming a good artist and he borrowed my triplus watersoluble pens to do his own drawings.

 
I sent him a set and a waterbrush of his own before I left to go home.

Sunday, 21 October 2018

A FEW MORE PORTAITS

 
I'm working away in the background making the portraits for my Mum's memorial quilt and here are the latest few I've completed.
This handsome young man is my nephew Sebastian, son of my younger sister Juliet.

 
The second portrait of Stephanie my middle granddaughter is much prettier from the first one I made.

 
Here is Juliet, hand stitched on linen to co-ordinate with the other pictures of the same generation like Christopher and the others I want to do of Rosi and myself.

 
Sarah's machine stitched portraits have been turned into gifts for her birthday, this one is now on the cover of an A4 sketchbook I've made for her.


I machine embroidered a message on the inside of her card and decorated it with appliquéd butterflies, then made a drawstring bag with the same fabric to use as wrapping for the card and sketchbook.

 
The last machine stitched portrait is now on the front of Sarah's card which I stiffened with some pelmet interlining which is stiff enough to keep the card standing.
I hope you've enjoyed this look at my latest work and I'll be back soon with some more in a few weeks after my autumn visit to see the family in England.