Pages

Showing posts with label Mi-tientes paper. Show all posts

Saturday, 7 March 2015

TENERIFE 2015 Part 2

 
After a couple of days sunbathing and doing the Pilates and aquagym  I soon realised that my turquoise swimming costume was wearing out fast.  The fabric was stretching in areas of stress and I really needed to buy a new one.  Being in a holiday resort I thought it would be easy to find something suitable but after 10 shops and umpteen clothes changes where the body was invariably too short or the colour wrong I was on the point of giving up.  An idea from Bob to go to another shopping centre to have a look was the answer and we found the 'Parah' shop, full of lovely things and a wonderfully helpful saleslady.  She told us about the promo of the week: 2 for the price of one so Bob was happy too!  After a lot of trial and error I found 2 lovely Italian suits made of quality fabric and with excellent shaping inside and although I had to buy a larger size to get the body length they do give me a much enhanced bust!

 
Here's a sketch of the palm trees next to my sunbed one afternoon drawn in the new Derwent line painters which had got a little hot in the sun and started to blob badly.  I quickly got out my waterbrush and spread the ink and I think I rather like the effect despite it not really looking like the real thing.  In future every time I used them I was prepared in advance with tissues and brush!

 
The hotel was very good with the entertainment every evening and we used to sit in the lobby for a short while after dinner before going in to the bar to order our nightcaps.  From the sofa I could see 'Mara' singing with her small band through a series of mirrors. I memorised the view to draw the next day in my sketchbook as I didn't yet have the confidence to draw publicly in the bar. (This changed the next time she performed but you'll have to wait till next week to see the results!)

 
Some more of those palms in coloured pencils this time and only the writing in the line painters and as you can see they are still blobbing and had to be rescued.


After our energetic mornings and a salad for lunch our afternoons were spent relaxing in the gardens by the pool.  I managed to capture Bob reading his kindle and he's only wearing his shirt to protect him from the sun which was pretty hot and he doesn't like to use a lot of sunscreen.


One of the best of the entertainers was 'Johnny Circus' a Charlie Chaplin impersonator.  He started his evening in the dining room chatting up all the children and blowing up those long thin balloons so that by show time he was like the pied piper with all the kids following him and copying his actions. He performed a mixture of magic and slapstick and encouraged quite a few of the audience to participate in his tricks. By the end of the evening my face was aching from laughing so much!

Thursday, 5 February 2015

A NEW SKETCHBOOK

 
I spent a few days at the end of last year making some beautiful new sketchbooks.  I was inspired by an embroidered skirt I found in a charity shop when I visited England. The size was far too small for anyone in the family so I spent £8 and brought it home.

 
I chose a selection of Mi-teintes papers to co-ordinate with the embroidery and bought full sheets which I then tore down to the size I had chosen.  Full sheets always have the maker's brand embossed down one of the long sides which I had to tear off first, I took about 10 cms so that I could use the narrow strips for a tiny sketchbook or small loose sketches. Then each sheet was torn in 4 across the short side to give me pieces measuring 40 x 16 cms. These sheets were then folded in half and pressed with the bone folder you can see in the photo.


I collected all the folded sheets and made pairs of sheets which are called signatures in bookbinding. Depending on the thickness of the paper you can have more sheets per signature but as this was quite thick I decided 2 was enough. Then I arranged them in a pleasing colour sequence and prepared for the stitching. I have a 'cousoir,' a stitching frame I bought 2 years ago when I took a lesson with the local bookbinder, which I set up with the tapes as you can see here. The process of stitching the signatures together is quite complicated so if you want to know more I suggest you have a look at some of the Youtube videos that are very easy to find.


After the stitching comes the glueing of the spine and the reinforcement with a strip of fabric, for which I use a piece of cotton from a sheet. The glue is intended to seal the spine of the book so that you don't get any gaps when you open it fully.  I put each book in turn in the press and spread and press the glue into the paper before leaving it to dry.  The ribbon page markers are stuck in first before the cotton so that they are well anchored.

 
I unpicked the skirt and pressed it carefully as the linen fabric around the embroidery was a bit puckered.  I worked out how I would cut the covers to make the best of the beautiful flowers and then ironed a piece of interfacing on to the back of each one.  This is essential to seal the fabric otherwise the glue would come out through to the outside when I stuck the fabric to the boards.

 
The next step was to cut the cover boards and make the spines to join them together. I keep old watercolour and sketchpad backs for this purpose and use offcuts of thin card for the spines as they need to be flexible.  I found that the fabric covers were too thick in places to roll over the edges to give a good finish so I stitched a narrow strip of plain fabric for the turn ins.  I then had the job of glueing the fabric to the boards, very nerve-racking, as it's all too easy to get the glue on the outside if you don't take care.


Now I have to assemble the books by glueing the pages to the covers, taking care that all the components are square and centrally placed.  I put sheets of plastic between the cover and the first page of the book to prevent any glue spreading to the pages and then I put each book in the press overnight to be sure they were completely dry.  As you can imagine this is a very time consuming process as although I can make all three together the final construction part has to be done one at a time.  I'm very pleased at how these three books have turned out and my sister loved the one I gave her for her birthday.

 
I've put a pocket inside the front cover to hold scraps etc and this is how I decorated mine, with quotations from Van Gogh who is also on the front page as you can see at the top of the post.
I'm looking forward to taking my new sketchbook on holiday with me in 10 days time so you'll be seeing a lot more of it when we return at the end of February.
By the way I also have a Facebook page called Colours in the Breizh where I post pictures as I draw them so please do go and take a look there if you are on FB.  Please 'like' the page too and then you'll get an update each time I post something new.
Thank you for reading so far and I hope you've enjoyed our foray into bookbinding, my next project is a portrait step by step of my grandson so look out for that in a few days time. 
Hope to see you soon!
 

Saturday, 29 November 2014

NEW PORTRAITS

 
Every year I try to draw a portrait of each of my granddaughters, for my own pleasure as well as a wish to keep a record of them as they grow up.  Photos are fine but there's nothing like trying to capture a likeness in pencil on paper.  This first picture of Sarah is one of my favourites taken from Facebook where she loves to post moody photos of herself and with her cat, Narvi, who you saw last week on her birthday card.
 
 
With them all as Facebook friends it's very easy for me to get hold of good, natural photos which they are always changing on their personal profiles. Steph spends the least time on Facebook so I have to keep an eye on the photos the others post from time time.  This one is very typical of Steph with her sunny, quirky personality.
 
 
Kirsty, the eldest, is at university now, so again it's easiest for me to catch glimpses of her life on Facebook.  I think this photo was taken last year in her special dress she wore for a school prize giving.
 
 
I remembered to scan the steps of the drawing as it progressed so you can see how the colours are built up.  I used my Museum coloured pencils on tinted paper chosen to echo the wonderful colour of her hair.  They have thick leads and can be used in layers that look a bit like pastels but without the annoying dust.
 
 
If you look closely you might see that I've scribbled some light blue in places as highlights in the hair to reflect the colour of her dress.  Kirsty was delighted with the portrait when I posted it on Facebook.
 
 
This collage of 3 separate portraits from 2011 was done in Derwent drawing pencils which have a wonderful range of earth colours suitable for this type of subject.
 
 
In 2009 I also used the earth colours having been inspired by studying portraits done by Leonardo da Vinci  and some of the Pre-Raphaelite artists like Dante Gabriel Rosetti and John William Waterhouse.
 
 
Way back in 2008 I was working in watercolours and produced this painting after first drawing the girls separately in pencil.  This one is still in a frame hanging in the spare bedroom.  The top 3 pictures are in frames in the hall and get changed each time I draw a new one.  I have now got quite an album full of all the earlier ones which make a really nice family portrait history. 
Maybe next time I'll take the plunge and share some of my early ones which are not very good drawings but it might be interesting for you to see how I started and how much my work has  changed and improved with years of practise!

Wednesday, 19 November 2014

SARAH'S BIRTHDAY CARD

 
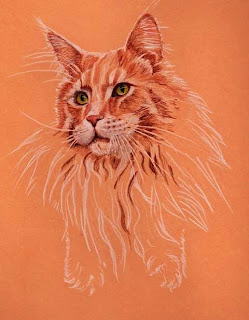
Today is my youngest granddaughter's 14th birthday and now that she has opened it I can show you her card I made this year.  It's a portrait of Narvi her favourite cat who spends a lot of time with her curled up on her bed.
 
 
I started by tracing a photo I took from Sarah's facebook profile page and then transferring it on to the tinted paper I had chosen, a lovely warm earth colour that reflects some of the colour in Narvi's fur.
 
 
I used a white Derwent drawing pencil to draw the outline first as these pencils have a thick lead and a very creamy texture that I wanted to use convey the fur in the picture.  I filled in the eyes first as if I had made a mistake I would have had to start again, then I started on the fur with the various earth shades in the Derwent collection.


I continued filling in the fur, gradually deepening in the shadows till I completed the portrait as you can see from the picture at the top of this post. 
 
 
I normally put in some money for Sarah to spend on something she wants and this time I printed off a section of the head and cut a slit where his mouth is.  I glued this on the inside of the card with a few notes stuck in his mouth.  I hope she smiled when she saw it as it did look rather funny as I closed the card to put in the envelope.
For cat lovers Narvi is a Maine Coon cat who has a black brother called Odin and an older cousin called Loki. 

Sunday, 13 July 2014

MAD ABOUT HYDRANGEAS

 
At this time of the year the town of Perros is full of tourists and the hydrangeas everywhere are blooming to give them a visual treat.  The colours are fabulous ranging from all the blues to shades of red and purple. They gradually fade and some change completely to pale green or the lightest of blues.
 
 
I have a couple of lacecaps in the garden as well as some of the more common mopheads.  Somehow the lacecaps are more interesting to draw with their pretty star shaped flowers in the centre. I'm still working in sketchbook no 25 with the mi-tientes paper and using my beloved Museum watercolour pencils dry. The first layer I do after the pen drawing is the white to indicate all the light areas.  I've found that is the only way to get the lighter colours to stand out on this tinted paper.
 
 
Then I start with the blue crayon but still leaving some of the white exposed. A bit of green reminds me where the leaf is hiding under the flowers.
 
 
Next colour to go on is the periwinkle blue, a light mauve shade, and a bit of a darker blue too to make the flower centres pop.
 
 
I complete the leaves with a variety of green shades and add another one to balance the composition. Then a final touch up on the flowers and a border done in all the colours I used for the flowers and my sketch is finished. 
I posted this step by step on Artists Journal Workshop Facebook group page this week and was overwhelmed by the response. I received nearly 200 likes and about 50 comments, mainly I think because I invited feedback as to whether I should have added the border or not.  The consensus was that it was better with the border but I redrew the flower without just to see the difference which is the picture at the top of the blog.  It's now mounted on a pretty mauve card ready for my mother-in -law's birthday.


Then I thought , why not do another one on plain white paper?  I had to pick another flower, this time a bluer version so I can show you the difference in method. 
 
 
Unfortunately I uploaded the pictures in the wrong order so the first one comes last but I'm sure you can see the way it works.  On white paper I start with the darkest parts and build up to the light colours, a bit like watercolour painting.
 
 
I used Polychromos pencils for the drawing as they are lovely and smooth on this Bristol paper. The picture is finished with a Derwent blender pencil which is a bit like mixing paint colours, it blends them together on the paper. 
 I do hope you have enjoyed my insight into the way I work and would love to hear what you think, is the picture better with, or without the border?

Saturday, 7 June 2014

A CHANGE OF MEDIUM

 
Last week I collected the books I had lent to a friend and after a browse through them I was re-inspired to do something different.  The books were Artists Journal Workshop by Cathy Johnson and Watercolour techniques with pen and ink by Claudia Nice.  I decided to have a change of medium for a few days and to do some work in my other sketchbook, no 24, which is filled with pale coloured mi-tientes paper.  This sketch of  magpies and a feather were done in a fine black micron pen and the background is a sky blue Polychromos coloured pencil.
 
 
This phalaenopsis orchid has survived about 3 years now and keeps on surprising us with it's wonderful flowers. They are pink but the micron pens I have are only red, blue and green so I had to improvise.  I sat and drew it in the evening while watching the TV.
 
 
I found a yellow micron brushpen in the collection so I added it to give the sunlit look to this palm in the garden.
 
 
We had oysters for lunch on Sunday and I couldn't resist keeping one of the shells to draw later  in the afternoon.  Thier shapes are fascinating with all the different layers which remind me of a flamenco dancer's dress.
I've had a lot of fun this week using some different materials, the micron pens are very fine, quite different to the coloured pencils I've been using for the last few months which give a much bolder line and colour. 
Anybody interested in starting an artists journal should invest in Cathy Johnson's book, it's full of ideas for tools and layouts as well as subjects to draw.

Sunday, 1 June 2014

ANOTHER SKETCHBOOK CATCH-UP

 
I've been so busy drawing and posting the sketches from my tinted paper sketchbook (25) I forgot to post some of the other drawings in sketchbook no 24.  This is one I drew of a wooden key given to me about 60 years ago by my godmother and still cherished as it's full of memories of Sweden and Auntie Chris. We kept in touch right up to her death only a couple of years ago when she was well into her 90s.
 
 
When we visited Roussillon in Provence a few years ago I bought some of the local ochre and other pigments to make my own watercolour paints.  I have used them for the odd painting but recently they have been sidelined by the coloured pencils so I thought I ought to check them out and found that some of the colours had grown a little grey mildewy coat.  I cleaned it off and added some clove oil which acts as a preservative and did a test sketch in the book which now smells lovely every time I open it!
 
 
We invited some friends round for a meal recently to celebrate my birthday and I decided to draw the meal I had prepared.
 
 
This is the cover of sketchbook no 24, a lovely fairy fabric I found while we were in Sweden 2 years ago.  I've enhanced the stars with some 3D gold outliner that I also use to name and date the sketchbooks on the spine.

Thursday, 29 May 2014

A WEEK IN A LOG CABIN

 
We've just been to England for a visit to Bob's part of the family. We stayed in a log cabin on a lovely site at Crowhurst near Hastings in East Sussex.  We could just see the sea through the trees growing up from lower down the slope in front  of our veranda. 
 
 
We had collected Mum on the Saturday and had a family get together at Bob's sister's home in Eastbourne on Sunday then on Monday we were up and off to do some sightseeing. Hastings is famous for it's fishing fleet that still beaches it's boats as there is no harbour to moor in.  These are some of the older ones restored and on display in an area on the seafront.
 
 
Hastings is also renowned for the net drying sheds, tall narrow wooden structures now used as fish shops and museum displays.  This tiny cottage next to the fishing museum has been made out of half the hull of an old boat, the other half was standing on it's end and used for more historical displays.
 
 
The interior of our cabin was very comfortable with leather sofas and soft beds. A very nice place to come back to and relax after our busy mornings out sightseeing.


We also visited Rye, a charming unspoiled old town with some very pretty cobbled streets lined with old timbered houses and lots of flowers and Battle, famous as the site of the battle of Hastings in 1066.  Unfortunately I left my camera at Sally's so was unable to take any photos to use as inspiration for more sketches and we weren't able to go and collect it till later in the week.
 
 
On the Wednesday evening Bob's brother, Ivor came to collect Mum to go home for a hospital appointment and Bob and I were left to our own devices for the last 2 days in the cabin.
 
 
I took a walk along the woodland path laid out at Crowhurst where there were many wild flowers to see.  The bluebells had just finished flowering  but must have been fantastic a few weeks ago as the seedheads carpeted every inch of the ground under the trees.